
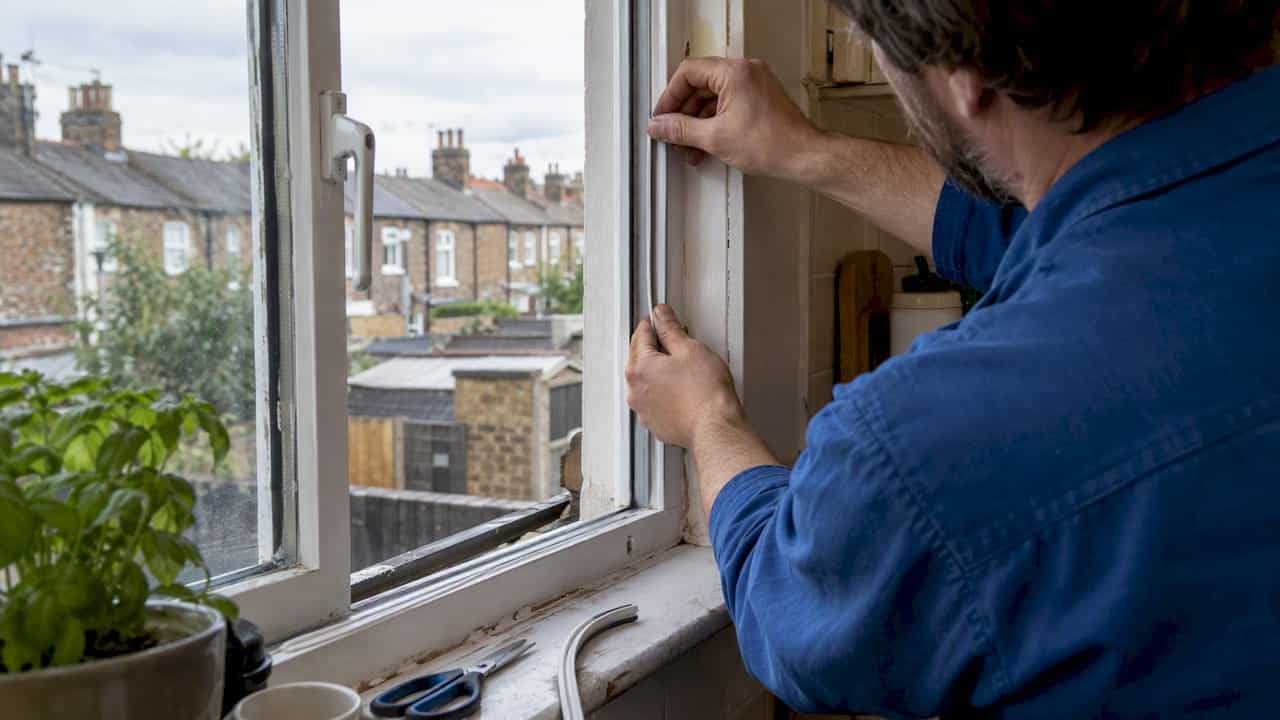
Measure the gap around the door or window first, choose a strip profile that matches that width, then fit it to the frame or sash rather than the moving leaf wherever possible. Most UK homes need foam tape, V-strip or brush pile for standard gaps, and compression seals for larger or uneven ones. Before fitting anything, check that trickle vents and other required ventilation stay clear. The step-by-step sections below cover doors and windows separately.
TL;DR:
- Properly measuring gap widths is essential, as most UK draught-proofing products only work within specific ranges, and mismatched seals fail quickly.
- Foam tape is suitable for narrow, even gaps on wooden or metal frames but is less durable than compression or brush seals, which last several years.
- Installing on damaged or warped frames is ineffective; repairs must be made beforehand to ensure a lasting seal and prevent future draughts.
- DIY fitment suits simple, square frames with standard gaps, but warped or complex framing may require professional installation for proper sealing.
- Ventilation must stay functional, especially around trickle vents and air bricks, to prevent condensation and indoor air quality issues after draught-proofing.
Table of Contents
- Types of weather stripping and when to use each
- Tools and materials you’ll need
- How to select the right weather stripping for your gap and frame condition
- Step-by-step: installing weather stripping on exterior doors
- Step-by-step: installing weather stripping on windows
- Finishing, testing and common fixes
- Ventilation, safety and energy impact: what to watch for
- HomeEnergyModel perspective and practical UK guidance
- Practical perspective: when DIY is best and when to hire a pro
- HomeEnergyModel services: energy assessment and professional support
- FAQ
- Sources
Types of weather stripping and when to use each
Choosing the right profile matters more than the brand of strip. Each type suits a different gap width, frame material and amount of movement, and picking the wrong one is the most common reason draught-proofing fails within a year.
- Foam tape suits narrow, even gaps (roughly 1 to 3mm) on wooden or metal frames, is cheap and easy to cut, but wears out fastest.
- V-strip (tension strip) works well on sash windows and casement doors where the gap is slim but the surfaces slide past each other.
- Brush or pile seals suit variable or uneven gaps, particularly sliding sashes and older timber frames that have moved out of true.
- Compression or EPDM rubber seals handle larger gaps (up to around 6 to 10mm) and compress consistently when the door or window closes against them.
- Tubular or bulb seals fit where a door or casement needs a firmer cushion against the frame, often on exterior doors with larger clearances.
- Threshold seals sit under the door itself and block draughts coming through the floor gap, usually paired with a door sweep.
Durability and cost rise roughly in that order: foam is the cheapest but shortest-lived, while compression and brush seals last several years with normal use. According to a DIY draught-proofing advice sheet from a community council, proprietary draughtstrips typically cost between £2 and £5 per metre, with a basic mastic bead costing around £5, so most jobs stay within a modest material budget.
Sash windows generally need brush or V-strip because the sashes slide rather than compress shut. Casement windows and most exterior doors do better with compression or tubular seals, since they close against the frame rather than past it. Sliding windows and patio doors need a low-friction wiper or brush seal that will not bind as the panel moves. When buying any strip, look for products that reference the British Standard BS 7386, which sets a quality benchmark for draught-reducing strips and gives some assurance the product will perform and last as described.
Tools and materials you’ll need
Having the right kit on hand before starting avoids a second trip to the shop halfway through a cold afternoon.
- Tape measure to check gap width at several points along the frame.
- Sharp utility knife or scissors for cutting strips cleanly to length.
- Wire brush or scraper to remove old, perished strip material and clean the frame.
- Mild detergent and cloth to degrease the surface before fitting adhesive strips.
- Small hammer and rustproof nails for carrier-strip types that fix mechanically rather than by adhesive.
- Mitre saw or block if corners need neat angled cuts, mainly for door thresholds.
- Gloves and eye protection when cutting metal carrier strips or working with mastic.
For materials, adhesive-backed foam or rubber strips suit smooth, flat surfaces and quick jobs, while nailed or screwed carrier strips (such as Retro-type profiles) suit uneven timber where adhesive alone will not hold. Mastic or sealant is worth having for gaps around frames rather than moving parts. Most of this kit, including letterbox flaps costing around £15 according to the same advice sheet, is available from any general DIY store, and none of it requires specialist ordering.
How to select the right weather stripping for your gap and frame condition
Picking a profile starts with an honest measurement, not a guess at the shop shelf.
- Measure the gap at the top, middle and bottom of each door or window, since timber frames rarely stay a uniform width along their length.
- Record the smallest and largest gap you find: a strip rated for a narrow range will fail where the gap opens wider.
- Favour brush or wiper seals over foam on frames that are warped, twisted or show uneven wear, since they flex to follow the surface.
- Treat compression seals as the default for consistent gaps on sound frames, since they give a firmer, longer-lasting seal.
According to guidance from Historic England, many draught-proofing products only work within a narrow range of gap widths, so matching the product to the measured gap, and checking it meets BS 7386, reduces the chance of buying the wrong one. If a sash sticks, a casement will not close square, or timber shows soft, rotten patches, repair or replace that component before fitting any seal. A strip fitted to a damaged frame will not hold its shape and the draught will return within months.
Pro Tip: Keep the packaging or a photo of the gap measurements until the job is finished, in case you need to return a product that does not match the actual gap.
Step-by-step: installing weather stripping on exterior doors
Exterior doors lose heat through several routes at once: the frame edges, the threshold, and small openings like letterboxes and keyholes. Working through each in order avoids missing a draught source.
- Check the door’s fit first. Open and close it slowly, watching for binding, dropped hinges or a leaf that no longer sits square in the frame. Fix hinge or alignment problems before sealing, since a strip cannot compensate for a door that hangs wrong.
- Inspect for rot or damage around the frame base and corners. Replace or repair any soft timber now, since fitting a seal over rot only hides a bigger problem.
- Remove old strips with a scraper or wire brush, then clean the frame surface with a cloth and mild detergent so new adhesive or nails grip properly.
- Measure and mark the frame where the new strip will sit, usually along the sides and top where the door meets the frame when closed.
- Cut the strip to length, mitring corners at 45 degrees where two lengths meet, and trial-fit it against the frame before committing to adhesive or nails.
- Fix the strip. For adhesive-backed foam or rubber, press firmly along the full length once the backing is peeled away. For carrier-strip types, drive nails only half way at first so you can adjust the strip’s position and pressure, a technique one local authority’s draught-busting manual recommends for Retro-type strips, then fully sink the nails once the fit is right.
- Fit a door sweep or brush threshold along the bottom, checking that it clears the floor or carpet enough to let the door swing freely without dragging.
- Seal the letterbox with a dedicated brush or flap cover designed for that opening, and fit a keyhole cover or escutcheon if the keyhole lets in a draught.
- Close the door and check for daylight or airflow around the full perimeter, adjusting any section that still gaps or binds.
Draught proofing windows and doors can save a modest annual amount on energy bills in Great Britain and Northern Ireland, according to Historic England. This makes a single exterior door one of the quicker payback jobs in a home’s draught-proofing list. For a closer look at bottom seals specifically, a dedicated guide on changing weather stripping on the bottom of a door walks through that one fix in more detail, and a fuller walkthrough of door seals generally is covered in a DIY guide for UK homes.
Step-by-step: installing weather stripping on windows
Windows vary more than doors in how they open, so the fitting method changes with the window type.
- Casement windows: mount a compression strip to the frame face where the opening sash meets it, running the strip continuously around the opening and paying particular attention to the meeting edges where two sashes close against each other.
- Sash windows: fit brush or pile seals, following the order recommended for Retro B, FS or 21B-type strips, which means fitting the head and sill first, then the sides, nailing lightly so the strip can be adjusted before final fixing.
- Sliding windows and doors: fit a low-friction wiper seal along the track edges, then slide the panel several times to confirm it still moves smoothly without catching on the new strip.
- Secondary glazing or sealed units: check ventilation needs before sealing fully, since historic or single-glazed windows sometimes rely on small gaps for airflow that a tight seal would remove.
Energy Saving Trust guidance recommends brush or wiper seals over foam for sliding or variable gaps, since they accommodate movement that foam cannot. Avoid painting the flexible part of any seal once fitted: Historic England notes that painting over the seal changes the material and reduces its performance, and most profiles are not designed to survive repeated removal for redecorating.
Pro Tip: Test a sash or casement for smooth movement immediately after fitting a new seal, before the adhesive fully cures, so you can peel and reposition it if it is binding.
For a deeper UK-focused walkthrough covering specific window types and thermal performance, the full guide to draught-proofing windows expands on each profile and fitting sequence.
Finishing, testing and common fixes
Once every strip is fitted, test the result before calling the job finished.
- Run a tissue or smoke test by holding a tissue or lit incense stick near the sealed edges on a windy day and watching for movement, which signals a remaining gap.
- Check for binding if a door or window feels stiff to close: trim a sliver off an over-thick strip rather than removing the whole length.
- Reposition rather than replace a seal that compresses unevenly, since a slight adjustment in position often fixes uneven pressure without buying new material.
- Inspect seals each autumn, since foam and rubber perish faster than brush or compression types and most need replacing every few years.
A strip that has gone flat, cracked or come loose at the edges has stopped working even if it looks intact from a distance, so a seasonal check before winter is worth the ten minutes it takes.
Ventilation, safety and energy impact: what to watch for
Draught-proofing should never block ventilation a home relies on. Trickle vents, air bricks and any opening required for a gas appliance or open fire must stay clear, since sealing them risks condensation, damp and poor indoor air quality. Energy Saving Trust guidance on ventilation recommends discussing ventilation with an installer whenever draught-proofing or insulation work is carried out, and notes that adding trickle vents to existing windows can risk damaging the frame, so that job is often best left to a specialist.
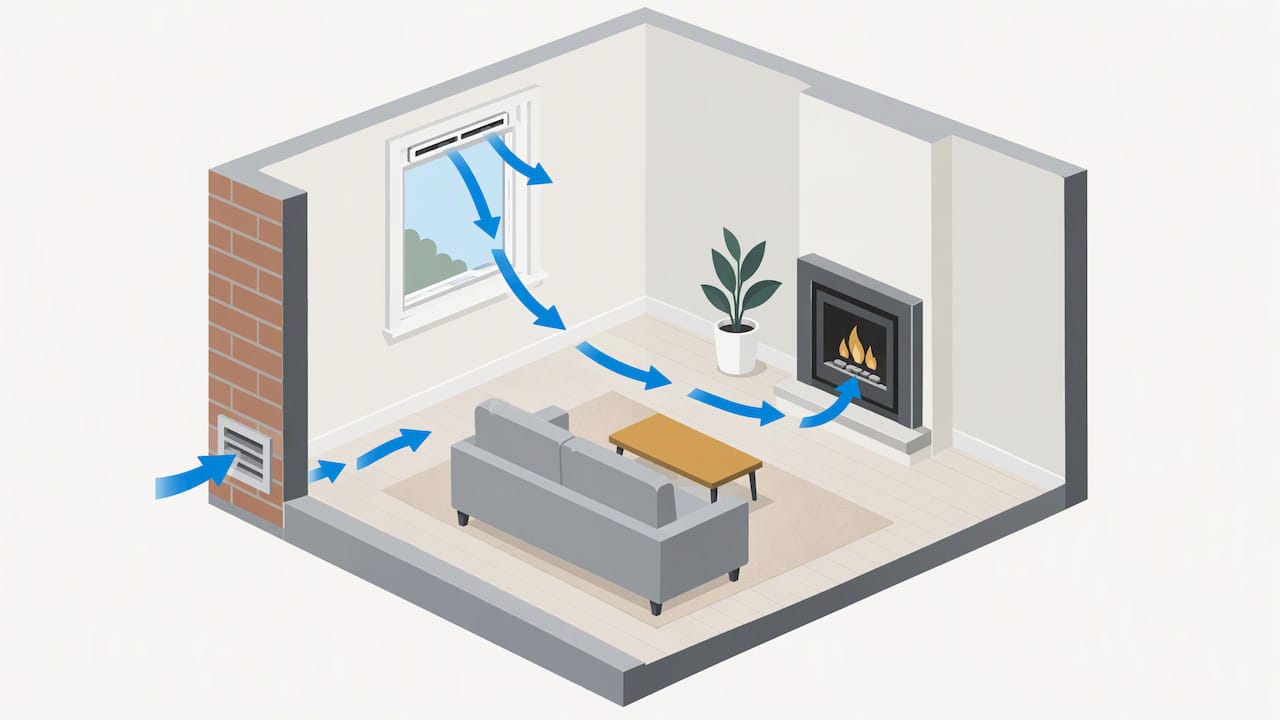
Draught proofing windows and doors can save a modest annual amount on energy bills in Great Britain and Northern Ireland, with a further £80 a year available from lowering a thermostat by 1°C, according to Historic England. That makes draught-proofing one of the cheaper retrofit measures for the saving it delivers, provided ventilation stays balanced. Homes with gas appliances or open fires need particular care, since reducing airflow around a heat source carries its own safety risk rather than just a comfort one. If draught-proofing is part of a larger retrofit affecting roof spaces or loft ventilation, a roofing contractor’s seasonal maintenance guidance is a useful companion check before sealing works begin.
HomeEnergyModel perspective and practical UK guidance
Weather stripping sits within a wider picture of how a home performs on energy, and that wider picture is where Home Energy Model’s guidance focuses. Draught-proofing on its own reduces air leakage, but how that leakage is assessed, and how it feeds into a property’s Energy Performance Certificate or future Home Energy Model rating, depends on a proper survey rather than a DIY estimate.
- The draught-proofing guide for UK windows covers profile choice and fitting in more depth for readers tackling a whole house.
- The door seal installation guide focuses specifically on exterior doors for readers who want one job done well.
- The guide to energy-saving steps for UK homes places draught-proofing alongside insulation, glazing and heating controls for a fuller view of where savings come from.
Danny, who put this guide together, focused on the fitting detail that most guidance skips: measuring the gap properly before buying, and checking the frame’s condition before assuming a strip will fix the draught. Those two steps decide whether a weekend’s work lasts five years or five months.
Practical perspective: when DIY is best and when to hire a pro
Fitting foam, V-strip or brush seals on a sound, square frame is a realistic weekend job for most homeowners, and the tools involved are the kind already found in a general toolbox. Call in a professional when a frame is warped, rotten or part of a listed or historic building, since matching the wrong seal to a distorted gap wastes money and rarely holds. DIY materials for a full house typically run to a modest sum in the tens of pounds, based on the per-metre strip costs and small-item prices set out by the draught-proofing advice sheet, while hiring a joiner or specialist installer costs more but suits awkward frames or larger retrofit projects. Where draught-proofing is part of wider work affecting ventilation, such as adding insulation or replacing multiple windows, check the ventilation plan alongside the sealing work rather than after it.
— Danny
HomeEnergyModel services: energy assessment and professional support
Sealing doors and windows fixes the draughts you can feel, but it will not tell you where a property is losing heat through walls, roofs or glazing, or how that affects its Energy Performance Certificate rating. Home Energy Model provides EPC assessments that look at a property’s full energy performance, which is useful once DIY draught-proofing is done and bigger questions remain about insulation, heating or compliance with upcoming standards.
For homeowners, a Domestic Energy Performance Certificate assessment gives a structured view of where a property stands and what would improve its rating. For landlords, developers or anyone managing non-domestic property, a Commercial Energy Performance Certificate covers the same ground for business premises. Readers planning larger retrofit or new-build work can also request Standard Assessment Procedure calculations to model energy performance ahead of construction or renovation. Request a quote through any of these pages to get a professional view of what comes after the draught-proofing is done.

FAQ
Do you apply weather stripping to the door or door frame?
Most weather stripping is fitted to the frame rather than the door leaf, since the frame stays still and gives a stable surface for the strip to seal against. Compression and tubular seals almost always go on the frame; some brush seals for letterboxes or thresholds are the exception and fit directly to the door.
Does weather stripping need to be glued?
Not always. Adhesive-backed foam and rubber strips rely on glue, but carrier-strip types such as Retro B or FS profiles fix with small nails instead, which suits timber frames where adhesive alone will not hold over time. Choose adhesive for quick jobs on smooth surfaces and nailed strips for uneven or older frames.
How do I properly apply weatherstrip adhesive?
Clean and dry the frame surface first, since dust or grease stops adhesive-backed strips from bonding properly. Peel back a short section of backing at a time, press the strip firmly along the frame, and work in short sections rather than pulling the full backing off at once to keep the strip straight.
What tool do I need to install weather stripping?
A tape measure, a sharp utility knife or scissors, and a wire brush or scraper to clean the old surface cover most jobs. For nailed carrier strips, add a small hammer and rustproof nails, and a mitre saw or block if the door threshold needs angled corner cuts.
Sources
- Energy efficiency and historic buildings: draught-proofing windows and doors (Historic England)
- Draught proofing – Energy Saving Trust
- Draft DIY draught-proofing advice sheet (Bures St Mary community council)