
Most UK homes need a heat pump rated between 4 kW and 12 kW, but that range is a starting point, not an answer. The correct figure comes from a room-by-room heat-loss calculation carried out to BS EN 12831 and MCS design guidance, not from floor area, not from a rule of thumb, and certainly not from matching the kW rating of the old gas boiler.
Here’s roughly what to expect before a survey confirms the real number:
- Small flat or well-insulated new-build: typically 4–6 kW
- Average three-bedroom semi: typically 6–8 kW
- Older or larger four-bedroom house: typically 8–12 kW
- Large, poorly insulated, or period property: often above 12 kW
The one action worth taking immediately is booking an MCS-certified heat-loss survey and asking the installer to hand over the design-day heat load in kW, not just a verbal estimate. Everything else in this guide explains why that number matters more than any other figure you’ll see quoted online.
Pro Tip: Never accept a quote that skips the heat-loss calculation and jumps straight to “you’ll need an 8kW unit.” Ask to see the room-by-room figures in writing before you sign anything.
Table of Contents
- What size heat pump do I need: how the calculation actually works
- Key factors that change your required heat pump size
- Typical kW ranges and worked examples for UK properties
- Common heat pump sizing mistakes and why they cost you
- What a professional heat pump survey actually includes
- Fabric and emitter upgrades that reduce the size you need
- Reading manufacturer output tables and why modulation matters
- Your next steps: a checklist before you contact installers
- The priority order that actually saves money
- Key takeaways for sizing a UK heat pump correctly
- Sources
What size heat pump do I need: how the calculation actually works
Sizing a heat pump means calculating how much heat a building loses on the coldest day of a typical winter, then choosing equipment that can replace that heat at the same rate. Installers do this room by room, adding up fabric losses (through walls, windows, roof and floor) and ventilation losses (draughts and required air changes), then applying diversity factors so the total doesn’t simply stack every room’s worst-case figure on top of the last.
Two numbers drive the whole exercise:
- Design external temperature (DOT): the coldest outdoor temperature the system is designed to cope with, based on regional weather data. It sits around −3°C for England and Wales, and colder still for parts of Scotland.
- Design-day heat load: the total heat the building loses at that DOT, expressed in kW, which becomes the target the heat pump must meet.
This is where a lot of confusion creeps in. Manufacturers publish headline efficiency figures tested at A7/W35, meaning 7°C outside air and a 35°C flow temperature. Those conditions are far milder than a January cold snap. BS EN 12831-1:2017 and MCS MIS 3005-D V3.0 are the standards UK installers work to, and a competent designer reads the manufacturer’s performance table at your actual DOT and your actual flow temperature, not the marketing headline on the box.
Diversity matters here too. Summing every room’s peak demand and installing a heat pump to match would produce an oversized system almost every time, because rooms rarely all hit peak loss simultaneously. Applying diversity correctly, as BS EN 12831 requires, keeps the central plant sized to what the building genuinely needs rather than a padded worst case.
Key factors that change your required heat pump size
A heat-loss survey looks at several variables, and they don’t all carry equal weight. Building fabric dominates the outcome far more than most homeowners expect.
- Insulation and wall type: solid brick walls without cavity fill lose heat far faster than modern cavity or timber-frame construction, often by a wide margin.
- Glazing and draughts: single glazing and poorly sealed doors and windows push up ventilation losses even in an otherwise well-insulated house.
- Floor and roof insulation: older properties frequently have shallow or missing loft insulation, which is one of the cheapest fixes with one of the biggest effects on load.
- Floor area and geometry: relevant, but secondary. A large, well-insulated bungalow can need less capacity than a smaller, leaky Victorian terrace.
- Emitter type: radiators sized for a 70°C-plus boiler flow temperature won’t perform well at the lower flow temperatures heat pumps run best at, and this affects both comfort and running cost, not just the kW figure on the nameplate.
- Local climate and outdoor unit siting: the regional DOT sets the design condition, while shading, wind exposure and clearance around the outdoor unit affect real-world performance.
- Electrical supply: single-phase supply limits can determine whether a property gets one larger unit or two smaller cascaded units instead.
Pro Tip: If your home has a mix of insulated and uninsulated rooms, ask the surveyor to flag which specific rooms drive the peak load. Fixing those two or three cold rooms can sometimes shift the whole property down a sizing band.
Typical kW ranges and worked examples for UK properties
The table below gives indicative bands based on common UK housing stock. Treat these as a sense check, not a specification.
| Property type | Typical heat pump size |
|---|---|
| Small flat or highly efficient new-build | 4–6 kW |
| Average three-bedroom semi | 6–8 kW |
| Older or larger four-bedroom house | 8–12 kW |
| Large or poorly insulated period property | 12 kW+ |
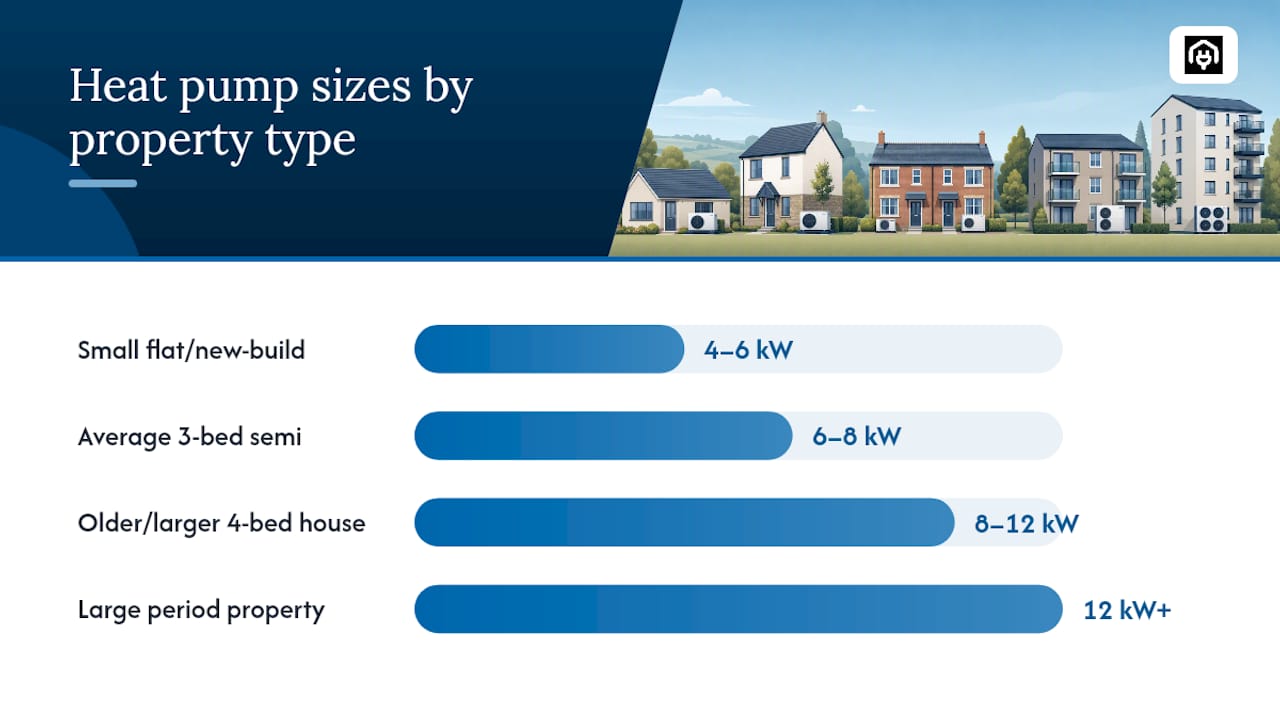
These bands align with the ranges most UK sizing guidance points to, and they’re a useful starting expectation rather than a substitute for a survey.
Here’s a simplified worked example to illustrate the logic, not to replace a proper calculation:
- A home built to current building regulations might have a fabric heat loss of roughly 30 W/m2.
- A 200 m2 modern house at that rate works out to around 6 kW at design conditions (200 × 30W = 6,000W).
- An older property with the same floor area but weaker fabric, commonly showing 50–60 W/m2, could land closer to 10–12 kW for the same footprint.
That gap between a modern build and a Victorian terrace of identical size shows why floor area alone tells you almost nothing useful. Two houses of the same size can sit in entirely different sizing bands depending on fabric quality alone, and only a proper survey settles which one your home resembles.
Common heat pump sizing mistakes and why they cost you
The single most common error is sizing the new heat pump to match the old boiler’s kW rating. It feels logical, since the boiler heated the house adequately, but it’s built on a false premise: gas boilers are routinely oversized by a wide margin, often installed at two or three times the actual heat demand because oversizing a boiler carries little downside. A heat pump behaves completely differently. An oversized heat pump short-cycles, switching on and off far more often than it should, which increases electricity use and wears the compressor down faster than steady, modulated running would.
Adding a blanket safety margin on top of the calculated figure, the old “go up a size to be safe” habit, is now actively discouraged. Modern MCS practice requires documented justification for any significant oversizing rather than an arbitrary uplift, precisely because that habit has caused so many underperforming installations.
Getting sizing wrong in either direction has real consequences. Undersizing leaves cold rooms and forces the system to run near-constantly on the coldest days, chasing a target it can’t quite reach. Oversizing does the opposite kind of damage: it drops the unit’s coefficient of performance, drives more on/off cycling, and shortens component life, all while the running costs quietly creep upward.
Neither mistake is obvious on day one. Both show up months later as a higher electricity bill, a noisier unit, or an engineer callout that traces straight back to a specification that skipped the proper calculation.
What a professional heat pump survey actually includes
A proper MCS-certified survey follows a defined sequence, and knowing the steps helps you judge whether a quote is thorough or rushed.
- Site visit and room measurements: dimensions, orientation and construction type for every heated room.
- Fabric and ventilation assessment: wall construction, insulation levels, window specification and draught sources.
- Emitter and pipework survey: existing radiator sizes, positions and pipe runs, or underfloor heating layout where fitted.
- Heat-loss calculation: room-by-room losses summed with diversity applied for the whole-building design load.
- Manufacturer matching: checking a specific unit’s output at your DOT and chosen flow temperature against the calculated load.
By the end of that process, expect these documents, not a verbal quote:
- A design-day heat load stated in kW for the whole property.
- A room-by-room heat-loss table showing individual room outputs, used for radiator or underfloor sizing.
- A recommended flow temperature for the system.
- Design notes explaining the reasoning behind the specified unit, including any oversizing above the calculated figure.
The methodology should reference BS EN 12831, the manufacturer’s own performance tables, and compliance with MCS MIS 3005-D V3.0. If a quote arrives without any of that paperwork, it’s worth asking why.
Fabric and emitter upgrades that reduce the size you need
Before assuming a larger heat pump is the answer, it’s worth checking whether the building itself is the more cost-effective fix. Improving loft insulation, upgrading single glazing, and draught-proofing doors and windows all reduce the calculated heat-loss figure directly, and they tend to deliver better payback than buying extra heating capacity to compensate for a leaky building.

Emitter upgrades matter just as much, if only because they’re overlooked more often. Larger radiators, or more radiator surface area spread across a room, let a heat pump run at a lower flow temperature while still delivering comfortable warmth. Lower flow temperatures directly improve the unit’s coefficient of performance, meaning more heat delivered per unit of electricity consumed. A home with undersized 1990s radiators forces the heat pump to work at a higher flow temperature just to keep up, which drags efficiency down across the whole heating season.
A typical retrofit priority order looks something like this in practice: loft insulation first, since it’s usually the cheapest per kW of reduction; draught-proofing next; radiator upgrades in the coldest rooms after that; and only then does the heat-pump specification get finalised. Get this sequence backwards, and you risk buying a heat pump sized for a leaky house, then insulating afterwards and ending up with an oversized unit cycling inefficiently for the rest of its working life.
Reading manufacturer output tables and why modulation matters
Every heat pump quote should include the manufacturer’s performance data at your specific design conditions, not just the standard A7/W35 rating printed on the datasheet. That headline figure is measured at 7°C outdoor air, a temperature far milder than a UK winter’s coldest week, so it tells you almost nothing about how the unit performs when it actually needs to.
- Ask for the output figure at your regional DOT and at the flow temperature the survey recommends.
- Check which discrete output band the unit sits in. Domestic heat pumps commonly come in bands such as 5, 7, 11, 14 and 16 kW, so the specified model may sit some way above your calculated figure simply because there’s no size in between.
- Look at minimum fractional output, the lowest percentage of full capacity the unit can modulate down to. A unit with a low minimum output runs more smoothly through mild autumn and spring days, cycling less and holding a steadier, more efficient output.
Pro Tip: If the quoted unit’s capacity sits more than 15% above your calculated design-day load, ask the installer to explain why in writing. A jump between discrete output bands is a legitimate reason; a vague “just to be safe” is not.
Your next steps: a checklist before you contact installers
Before requesting quotes, gather a few basic facts about your property. It speeds up the survey and helps you sense-check whatever figure comes back.
- Floor area and approximate age of the property.
- Wall construction (solid brick, cavity, timber frame).
- Loft insulation depth, if known.
- Window type (single, double, or secondary glazing).
- Existing radiator sizes, or confirmation that the home has underfloor heating.
- Any consistently cold rooms, and where they sit in the house.
When you do speak to installers, ask these three questions directly:
- “What is my design-day heat load in kW, based on a room-by-room calculation?”
- “What is this specific unit’s output at my region’s design temperature and the flow temperature you’re proposing?”
- “Are you MCS-certified, and can you provide the calculation printout alongside the quote?”
Pro Tip: Request documented justification any time a proposed unit exceeds your calculated load by more than 15%. A credible installer will have a straightforward answer; one who can’t explain it is guessing.
The priority order that actually saves money
Improve the fabric and emitters first, wherever it’s genuinely feasible, and only then specify the heat pump from a documented heat-loss survey. That order isn’t a preference; it’s what the numbers in this guide point to. A retrofit that fixes a draughty loft or swaps out undersized radiators before the heat pump goes in almost always ends up with a smaller, cheaper unit running at a lower flow temperature and a better coefficient of performance for its entire service life.
The risk of skipping that sequence isn’t abstract. A heat pump specified against an unimproved building, or against a guessed figure rather than a proper calculation, tends to surface its problems slowly: a higher-than-expected bill in the first winter, more cycling noise than the brochure suggested, an engineer visit eighteen months in that traces back to a design decision made before a single measurement was taken. Standards-based sizing, backed by a paper trail referencing BS EN 12831 and MCS guidance, is the cheapest insurance against that outcome you’ll find anywhere in the whole project.
Key takeaways for sizing a UK heat pump correctly
The correct heat pump size comes from a room-by-room heat-loss calculation to BS EN 12831 and MCS guidance, not from floor area or the old boiler’s rating.
| Point | Details |
|---|---|
| Get a proper survey | Book an MCS-certified heat-loss survey and request the design-day load in kW, not a verbal estimate. |
| Know the typical bands | Most UK homes fall between 4 kW and 12 kW, with fabric quality mattering more than floor area. |
| Fix the building first | Loft insulation, draught-proofing and radiator upgrades often cost less than oversizing the heat pump. |
| Check output at design conditions | Ask for the manufacturer’s table at your regional DOT and proposed flow temperature, not the A7/W35 headline. |
| Question oversizing | Request written justification for any unit specified more than 15% above the calculated load. |
Sources
For homeowners planning a real installation, the Energy Saving Trust’s heat-loss calculation guidance is the most practical starting point, covering exactly how room-by-room losses are calculated and diversified for a full building design. For a deeper look at how discrete output bands and design-condition output tables work, the Reading Heat Pumps sizing guide breaks it down clearly.
- What Size Heat Pump Do I Need? UK Sizing Guide 2026
- Heat loss calculations – detailed guidance · Energy Saving Trust toolkits
- Heat pump size: What do you need and how is it calculated? | Homebuilding
If you’d rather have the heat-loss calculation handled professionally from the outset, Homeenergymodel’s home energy assessment service produces the documented, standards-based figures an installer needs to specify the right unit the first time, rather than guessing and finding out the hard way.