

Installing a Nest Learning Thermostat will not, on its own, lift a current EPC band under SAP or RdSAP, because the assessment methodology assumes fixed occupancy and control patterns regardless of the device fitted. The forthcoming Home Energy Model changes this picture, since it proposes a smart readiness metric that can credit the installation. The practical step now is to document the fitting properly and arrange for an assessor to see or record it.
TL;DR:
- Installing a Nest thermostat does not automatically improve EPC ratings under current SAP or RdSAP because they only recognize fixed control types, not learning algorithms.
- To reflect a smart thermostat legitimately, documentation such as installer certificates, serial numbers, app exports, photographs, and zone labels must be provided during assessment.
- Home Energy Model’s upcoming smart readiness metric aims to credit the presence, functionality, and integration of smart devices, gradually influencing EPC bands in future assessments.
- Compatibility issues may arise with older or complex systems, so it is essential to verify system wiring and features before installation using manufacturer checks, especially on multi-zone and off-the-shelf boilers.
- Accurate assessment and documentation at installation can significantly reduce the risk of the device being overlooked or misrecorded during EPC evaluation.
Table of Contents
- How smart thermostats are treated now under SAP and RdSAP, and what HEM proposes
- What assessors record and the evidence you need to provide
- Why manufacturer savings claims won’t move your EPC
- Practical checklist for EPC and HEM documentation
- How the physical installation actually happens
- Checking compatibility before you install
- Setting up and personalising the thermostat after installation
- Fixing common installation problems
- Safety and tools needed for the job
- Connecting to Wi-Fi and setting up remote access
- What I’ve seen go wrong, and how to avoid it
- Get professional help with your EPC or HEM assessment
- Sources
- FAQ
How smart thermostats are treated now under SAP and RdSAP, and what HEM proposes
Current EPCs run on SAP for new builds and RdSAP for existing homes. Both use standardised occupancy and heating patterns rather than how a household actually behaves. This is precisely why a Nest thermostat rarely moves the needle on a certificate today. The methodology was built around fixed control categories such as “programmer plus room thermostat” or “time and temperature zone control.” A learning algorithm that adjusts itself based on occupancy patterns simply has no box to tick.
That gap is well documented. The EPC Accuracy project run by the Department for Energy Security and Net Zero found an average model to meter performance gap of 16.0%, falling to around 10.9% once adjustments were made. Part of that gap comes from models that cannot see, or credit, the smart controls actually installed in a property.
The Home Energy Model consultation addresses this directly. It proposes a smart readiness metric scored from 1 to 100 and banded A to G, sitting alongside the main energy rating rather than replacing it. Three things this metric is expected to assess:
- Presence: whether a smart heating control, smart meter, or storage device is actually installed.
- Functionality: whether the device supports remote scheduling, zoning, or learning behaviour.
- Integration: whether it connects to a smart meter, hub, or wider building management system.
HEM is being introduced in modules rather than as a single switch, and the consultation timeline means full smart readiness scoring will roll out gradually. Assessors may start recording device presence well before the metric is formally weighted into a certificate.
What assessors record and the evidence you need to provide
An assessor visiting a property does not take your word for a smart thermostat being fitted. RdSAP surveys record specific, checkable details: the control type present, whether it integrates with a smart meter or hub, and how heating zones are defined within the property. A Nest fitted in a single reception room heated separately from bedrooms, for example, needs that zoning stated clearly, or the assessor may record it as a single whole house control and miss the distinction entirely.
Five pieces of evidence tend to satisfy an assessor without argument:
- The installer’s certificate, showing who fitted the device and when.
- The unit’s serial number, matched against the property address.
- An account export from the Nest app showing schedules and zone names.
- Dated photographs of the thermostat mounted in situ, ideally with surrounding wiring visible.
- A clear label at the property identifying which room or zone each thermostat controls.
Pro Tip: Put the installation pack together the same day the device goes in, not weeks later when you book the assessment. Serial numbers get lost and app exports only cover activity from the point of setup, so late paperwork often understates how long the control has actually been running.
Bringing this pack to the assessment visit, rather than emailing it afterwards, matters more than most landlords expect. The EPC accuracy research treats improved assessor evidence as one of the main routes to closing the performance gap, and an assessor working from a printed pack on site makes fewer transcription errors than one working from a follow up email.
Why manufacturer savings claims won’t move your EPC
Nest’s own UK marketing has cited savings that may appear generous and should be treated with caution before assuming they will show up on a certificate.
Manufacturer savings claims across the smart thermostat market are frequently calculated against an unrealistic baseline rather than typical UK household behaviour.
Which?’s analysis found Nest’s calculations assumed a baseline of heating much longer per day before the thermostat was fitted, a figure higher than what government usage data suggests for most households. Compare a device against an inflated starting point and the apparent saving inflates too.
Government research backs this up from a different angle. The rapid evidence assessment on heating controls found that savings from any advanced control depend heavily on:
- The base case: what heating pattern existed before installation.
- Boiler modulation: whether the boiler itself can respond efficiently to shorter, more frequent calls for heat.
- Occupant behaviour: whether residents actually use scheduling and geofencing features rather than overriding them constantly.
None of these variables are things an EPC assessor can verify from a single visit, which is exactly why RdSAP does not attempt to model them. HEM’s smart readiness metric sidesteps the problem by scoring what is installed and how it integrates, not what percentage saving a manufacturer claims. That is a more durable measure for compliance purposes than any headline percentage, and it is worth reading alongside a broader energy efficiency rating guide if band movements are the priority.
Practical checklist for EPC and HEM documentation
Getting a smart thermostat recognised correctly starts on installation day, not at the next EPC renewal. Physical placement matters: mount the unit somewhere visible and accessible, avoid tucking it behind furniture or curtains, and label each thermostat with the zone or room it controls if the property has more than one heating zone. An assessor working quickly through a multi-unit property will thank you for a laminated label over a verbal explanation.
Six items form the documentation handover:
- Installer certificate with date and installer details.
- Serial number recorded against the property address.
- Account export from the Nest app covering the schedule configuration.
- Timestamped photographs of the mounted unit and any wiring.
- A written note of which rooms or zones each thermostat serves.
- Confirmation of any hub or smart meter the thermostat connects to.
Leave a copy of this pack at the property and send a duplicate to whoever conducts the assessment. Administratively, most re-assessments follow the same route as any EPC update: booking a fresh domestic assessment or, for a full HEM based recalculation once the methodology is live, commissioning updated SAP or HEM calculations. Costs and turnaround vary by assessor and property type, so treat any online estimate as indicative rather than fixed, and confirm timescales directly when booking.
A handful of practical measures pair well with a smart thermostat and tend to show up more reliably on an EPC than the thermostat alone, including smart TRVs and better zoning, covered in this energy saving technologies guide.
How the physical installation actually happens
A Nest Learning Thermostat replaces the existing wall thermostat or, in many UK homes, sits alongside the boiler’s existing programmer. The installer isolates power at the consumer unit, removes the old control, and identifies the wiring configuration behind it, since UK systems vary between simple on/off circuits and OpenTherm compatible boilers that support modulating control.
The Nest base plate mounts to the wall using either the existing cable hole or a fresh fixing, with wires connected to the corresponding terminals according to the wiring diagram supplied with the unit. Where an existing thermostat used a different wiring standard, an adapter or additional wiring may be needed rather than a straight swap. Once wired and the display unit clipped onto the base, the installer restores power and runs the on-screen setup, which checks the wiring configuration and confirms compatibility before finishing.
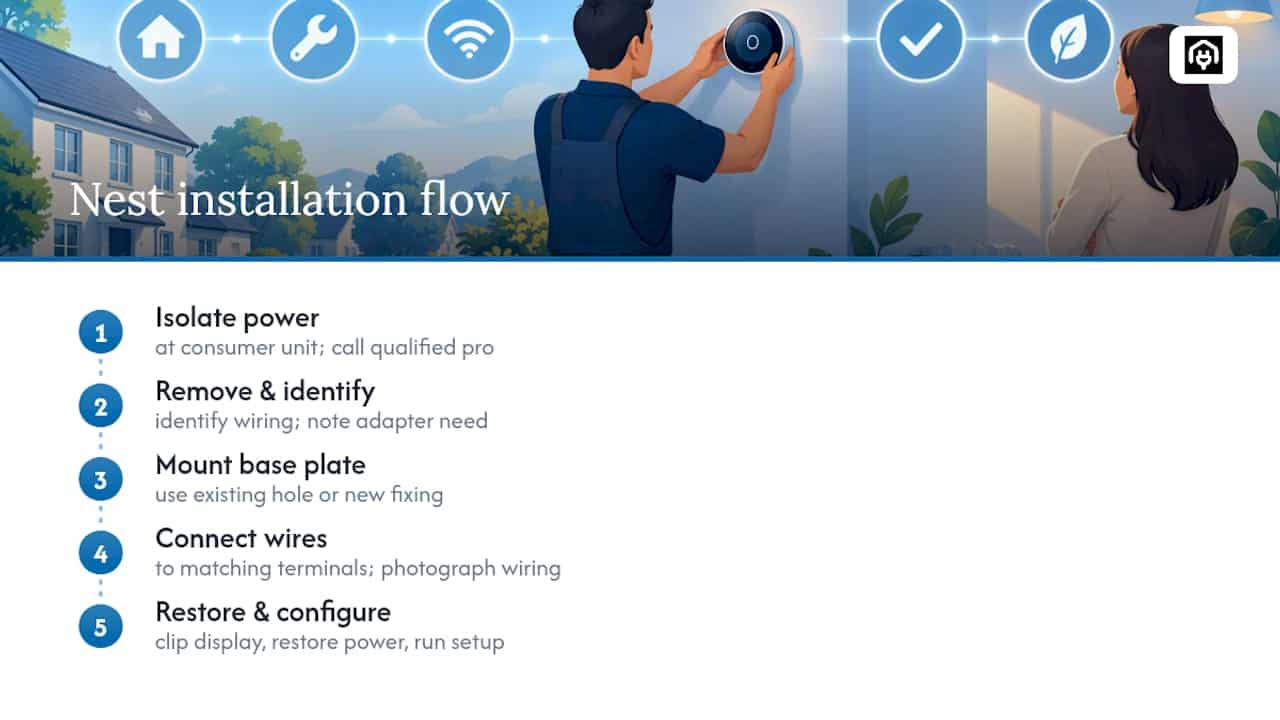
For landlords managing several properties, the wiring stage is also the moment to record zone information for the documentation pack described earlier. Noting which room the thermostat controls, and photographing the wiring before the cover goes on, saves a great deal of explanation to an assessor later. A qualified heating engineer or electrician should handle any work involving mains wiring or boiler control circuits, particularly on older systems.
Checking compatibility before you install
Not every UK heating system is a straightforward match. Nest’s compatibility checker, accessed through the manufacturer’s own setup tools, confirms whether a specific boiler and wiring arrangement will work before any wires are disconnected, and this step should happen before booking an installer, not on the day.
Systems most likely to need extra attention include heat only boilers with older two-wire thermostat wiring, systems using a separate hot water cylinder with its own controls, and multi-zone properties where more than one thermostat manages different areas. Combination boilers with standard OpenTherm or on/off wiring tend to be the most straightforward fit.
Properties with underfloor heating, electric storage heaters, or older heat pump installations may need a compatible receiver or additional hardware rather than a direct connection. Checking this in advance avoids a wasted callout and, for landlords, avoids leaving a property without heating control between the old thermostat coming down and a working replacement going up. It is also worth confirming with the current heating engineer whether the boiler needs a firmware update or a bridge unit to communicate properly with a smart control.
Setting up and personalising the thermostat after installation
Once wired and powered, the thermostat runs through an on-screen setup covering location, heating schedule preferences, and initial temperature targets. The unit then spends a learning period adjusting its schedule based on manual temperature changes made during the first one to two weeks.
Worthwhile adjustments at this stage include setting Eco temperature thresholds appropriate to the property’s insulation standard, defining separate schedules for weekdays and weekends where occupancy differs, and enabling geofencing so the system knows when the property is unoccupied. In a rental property, discuss these settings with the tenant rather than pre-configuring them entirely, since a schedule set to landlord preferences rather than the actual occupant’s routine tends to get overridden constantly, and constant manual overrides are exactly the occupant behaviour that undermines any projected saving.
Multi-zone properties need each thermostat named clearly within the app, matching the labelling recorded in the installation pack. This keeps the digital record and the physical evidence consistent, which matters if an assessor later cross references app screenshots against what is actually on the wall.
Fixing common installation problems
Most installation issues fall into a small number of categories. A thermostat that will not power on after wiring usually points to a wiring fault at the boiler end or insufficient power delivery, particularly on systems without a dedicated common wire; a professional check of the wiring against the boiler’s control panel resolves this in most cases.
An “incompatible system” message during setup typically means the wiring configuration was not fully recognised, often because a wire was connected to the wrong terminal or a required wire is missing entirely. Re-checking the wiring diagram against what is physically connected resolves this more often than replacing the unit.
Wi-Fi connectivity failures during setup are usually a router range or password issue rather than a thermostat fault, since these devices need a reliable 2.4GHz connection in most installations. Moving a temporary Wi-Fi extender near the thermostat during setup, then removing it later, often confirms whether range is the problem. Persistent boiler short cycling after installation, where the heating switches on and off more frequently than before, generally means the boiler’s modulation range does not suit the new control settings, and this is worth raising with a heating engineer rather than adjusting repeatedly through the app.
Safety and tools needed for the job
Any work involving a boiler’s control wiring should be treated as electrical work, not a simple DIY swap. Power at the consumer unit must be isolated before removing the old thermostat, and a non-contact voltage tester should confirm the circuit is dead before any wires are disconnected.
A basic toolkit covers most installations: a small flathead and Phillips screwdriver, wire strippers, a spirit level for mounting the base plate, and a torch for checking wiring behind the existing plate in poorly lit hallways. A multimeter is useful for checking voltage on unfamiliar wiring configurations, particularly in older properties where wiring colours may not follow current conventions.
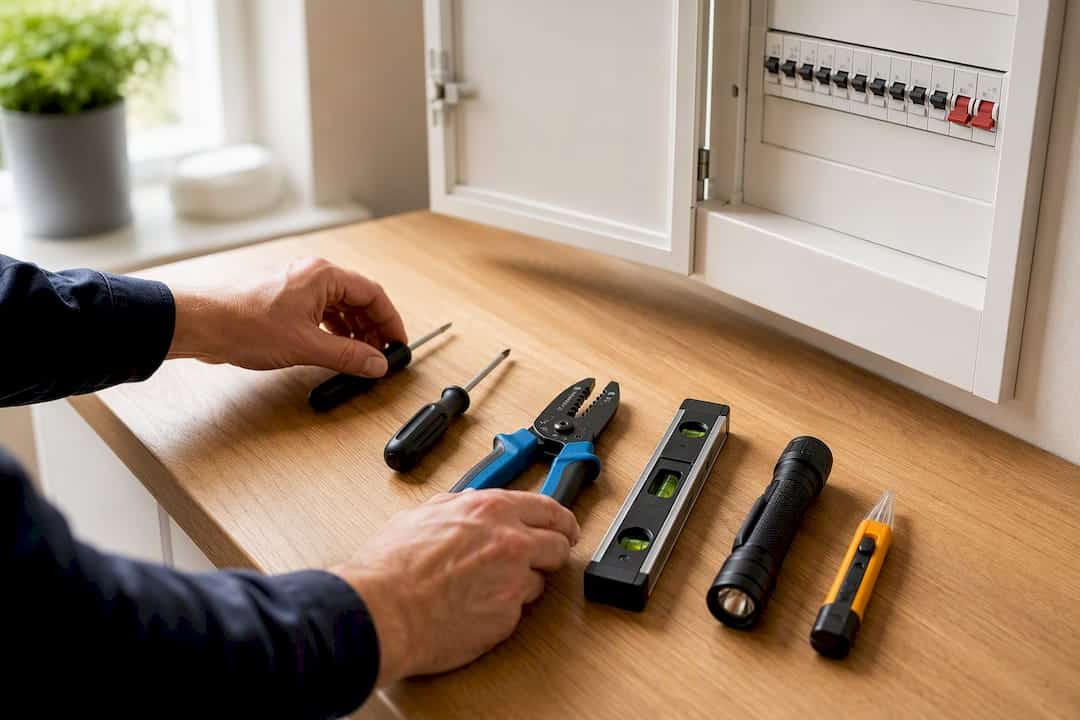
Boilers with mains-voltage switching, rather than low-voltage control circuits, should be wired by a qualified electrician or heating engineer, and any work on gas boiler controls that affects safety interlocks falls under Gas Safe regulations rather than general electrical work. Landlords should keep a record of who carried out the installation, since this doubles as part of the documentation pack an assessor will want to see.
Connecting to Wi-Fi and setting up remote access
During on-screen setup, the thermostat prompts for a Wi-Fi network and password, connecting over 2.4GHz in most UK household router configurations. Once connected, the display generates a pairing code used to link the physical unit to the Nest app on a smartphone or tablet.
The app setup asks for the property address and heating zone name, which should match whatever labelling appears in the installation pack, and from there remote control, scheduling changes, and energy history become available from anywhere with a data connection. For landlords managing rented properties, a household or family account structure allows both the landlord and the tenant to have appropriate access without sharing a single login. Reviewing usability of smart controls generally, including how remote apps handle multi-user households, is covered in more detail by consumer resources such as SmartSavvyHome.
What I’ve seen go wrong, and how to avoid it
The single most common mistake is assuming a smart thermostat improves an EPC automatically. It does not, under current RdSAP rules, and landlords who skip documentation because “the assessor will just see it” are usually disappointed by the result.
The second mistake is treating the assessment visit as an afterthought rather than the moment that decides whether the installation gets recorded correctly. An assessor working without evidence defaults to standard assumptions, which is exactly the gap HEM’s smart readiness metric is designed to close. Treat the thermostat as one line item in a wider compliance plan, documented alongside insulation, glazing, and any other measures being tracked, rather than a standalone fix expected to move a band on its own.
— Danny
Get professional help with your EPC or HEM assessment
Homeenergymodel supports landlords and property owners through exactly this kind of documentation gap, rather than leaving evidence collection to guesswork between installer and assessor. The service covers domestic EPC assessments and commercial EPC assessments, along with full SAP and HEM calculations for properties needing a complete recalculation rather than a simple update.
Booking an assessment means an assessor who checks installation evidence properly, liaises directly with installers where paperwork is incomplete, and lodges the certificate accurately rather than defaulting to standard assumptions. That is particularly relevant for landlords managing several properties, where inconsistent documentation across a portfolio creates avoidable compliance risk. Request a quote through the domestic EPC page to get a smart thermostat installation properly reflected in your next assessment.
Sources
- Smart thermostats: can you save what the companies claim? – Which?
- EPC accuracy report (BE24022) – Department for Energy Security and Net Zero
- Gov
FAQ
Will fitting a Nest thermostat improve my EPC rating?
Not under current SAP or RdSAP rules, since the methodology uses fixed control categories that do not distinguish a learning thermostat from a standard programmable one. The Home Energy Model proposes a smart readiness metric that will credit smart controls separately from the main rating once introduced.
What evidence should I give my energy assessor?
Bring the installer’s certificate, the unit’s serial number, a Nest app account export, dated photographs of the mounted thermostat, and clear zone labelling if the property has multiple heating areas. Handing over a complete pack at the visit reduces the chance of the device being missed or misrecorded.
Are Nest’s claimed savings figures reliable for UK homes?
Not directly, because Which?’s analysis found Nest’s 8.4% to 16.5% savings claims are calculated against an unrealistic 17 hour daily heating baseline rather than typical UK usage. Actual savings depend on the previous heating pattern, boiler modulation, and how consistently the schedule is followed.
Can I install a Nest thermostat without a C wire?
Many UK boiler systems can run without a dedicated common wire using the thermostat’s internal battery, though this depends on the specific wiring configuration and boiler type. Running Nest’s own compatibility checker before installation confirms whether the existing wiring supports this.
How much does a domestic EPC reassessment cost?
Pricing varies by assessor, property size, and location, so it is best confirmed directly when booking. Current pricing for a domestic EPC assessment through Homeenergymodel is available on request via the service page.